First thing first, learn basics of composite data entities using below URL:
https://docs.microsoft.com/en-us/dynamics365/unified-operations/dev-itpro/data-entities/develop-composite-data-entities
1. Data management work space > Import
2. Create new import project > “Sales order import” provide other info like description, project type = Import.
3. Create XML file like below:
xml version="1.0" encoding="utf-8"?>
<Document>
    <SalesOrderHeaderV2Entity>
        <SALESORDERNUMBER></SALESORDERNUMBER>
        <CURRENCYCODE>USD</CURRENCYCODE>
        <INVOICECUSTOMERACCOUNTNUMBER>DE-001</INVOICECUSTOMERACCOUNTNUMBER>
        <ORDERINGCUSTOMERACCOUNTNUMBER>DE-001</ORDERINGCUSTOMERACCOUNTNUMBER>
        <SalesOrderLineV2Entity>
            <ITEMNUMBER>D0001</ITEMNUMBER>
            <LINEAMOUNT>777.000000</LINEAMOUNT>
            <SALESPRICE>18.000000</SALESPRICE>
            <SALESPRICEQUANTITY>2.000000</SALESPRICEQUANTITY>
            <SHIPPINGSITEID>6</SHIPPINGSITEID>
        </SalesOrderLineV2Entity>
        <SalesOrderLineV2Entity>
            <ITEMNUMBER>D0003</ITEMNUMBER>
            <LINEAMOUNT>777.000000</LINEAMOUNT>
            <SALESPRICE>18.000000</SALESPRICE>
            <SALESPRICEQUANTITY>2.000000</SALESPRICEQUANTITY>
            <SHIPPINGSITEID>6</SHIPPINGSITEID>
        </SalesOrderLineV2Entity>
    </SalesOrderHeaderV2Entity>
</Document>
4. In selected entities area, click add file.
5. Entity name = Sales order composite v3, Source data format = XML-Attribute.
6. Click upload and add > browse the above xml and say ok.
7. Dialog appears to Generate mapping click Yes.
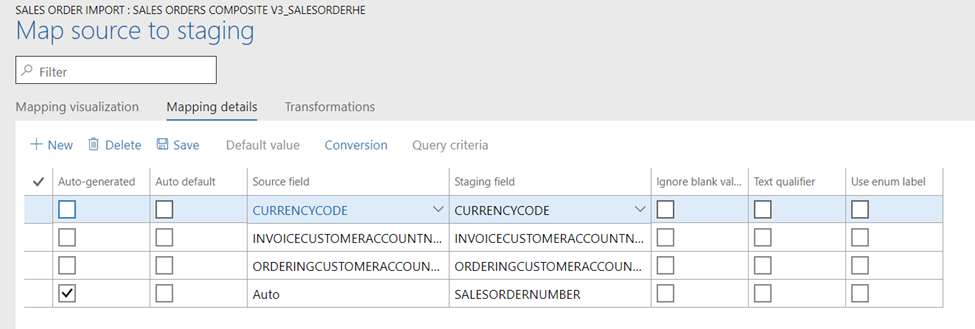
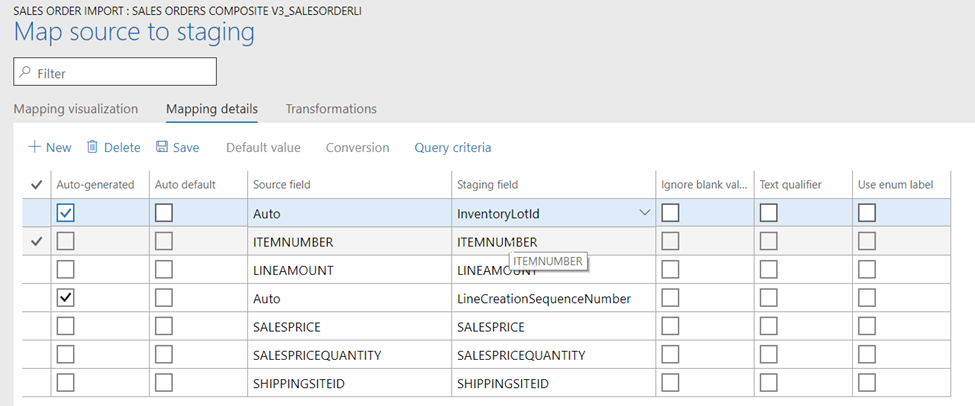
8. Once entity is added to lines section, scroll to the right click View map and set below map.
Header:
- Sales order number = mark as auto generated.
Lines:
- Inventory lot it = mark as auto generated.
- LineCreationSequenceNumber = mark as auto generated
9. Once done Save the configuration and import file.


