Translate

Sunday, July 1, 2018

Dynamics 365 Operations | Composite data entity – Sales order import (Only works with XML)

First thing first, learn basics of composite data entities using below URL:
https://docs.microsoft.com/en-us/dynamics365/unified-operations/dev-itpro/data-entities/develop-composite-data-entities
1.     Data management work space > Import
2.     Create new import project > “Sales order import” provide other info like description, project type = Import.
3.     Create XML file like below:
xml version="1.0" encoding="utf-8"?>
<Document>
    <SalesOrderHeaderV2Entity>
        <SALESORDERNUMBER></SALESORDERNUMBER>
        <CURRENCYCODE>USD</CURRENCYCODE>
        <INVOICECUSTOMERACCOUNTNUMBER>DE-001</INVOICECUSTOMERACCOUNTNUMBER>
        <ORDERINGCUSTOMERACCOUNTNUMBER>DE-001</ORDERINGCUSTOMERACCOUNTNUMBER>
        <SalesOrderLineV2Entity>
            <ITEMNUMBER>D0001</ITEMNUMBER>
            <LINEAMOUNT>777.000000</LINEAMOUNT>
            <SALESPRICE>18.000000</SALESPRICE>
            <SALESPRICEQUANTITY>2.000000</SALESPRICEQUANTITY>
            <SHIPPINGSITEID>6</SHIPPINGSITEID>
        </SalesOrderLineV2Entity>
        <SalesOrderLineV2Entity>
            <ITEMNUMBER>D0003</ITEMNUMBER>
            <LINEAMOUNT>777.000000</LINEAMOUNT>
            <SALESPRICE>18.000000</SALESPRICE>
            <SALESPRICEQUANTITY>2.000000</SALESPRICEQUANTITY>
            <SHIPPINGSITEID>6</SHIPPINGSITEID>
        </SalesOrderLineV2Entity>
    </SalesOrderHeaderV2Entity>
</Document>
4.     In selected entities area, click add file.
5.     Entity name = Sales order composite v3, Source data format = XML-Attribute.
6.     Click upload and add > browse the above xml and say ok.
7.     Dialog appears to Generate mapping click Yes.
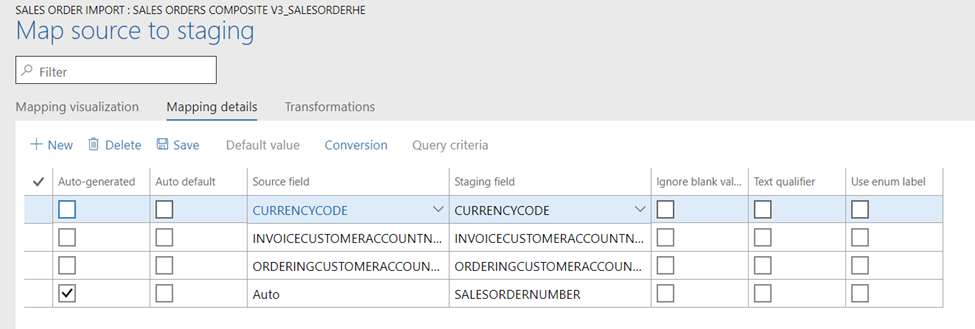
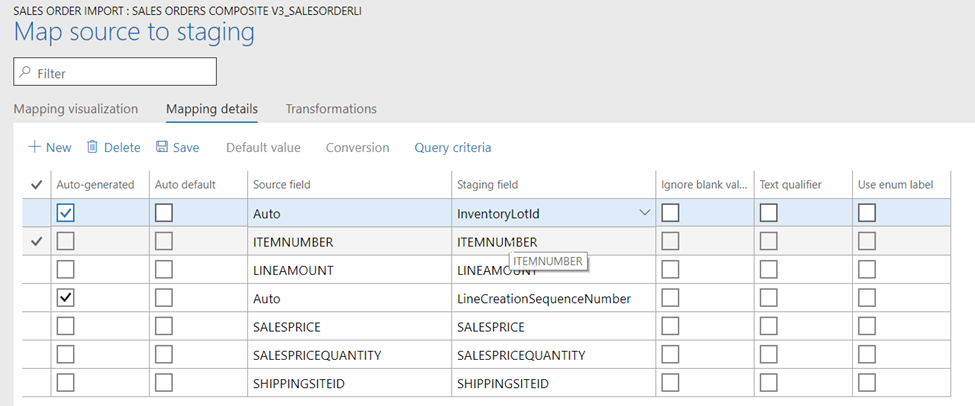
8.     Once entity is added to lines section, scroll to the right click View map and set below map.
Header:
-       Sales order number = mark as auto generated.
Lines:
-       Inventory lot it = mark as auto generated.
-       LineCreationSequenceNumber = mark as auto generated
9.     Once done Save the configuration and import file.

Dynamics 365 Operations | REST APIs | Package API

First thing first, learn basics of Service endpoints available in Dynamics 365 for Operations using below URL:

Import file to Dynamics 365 Operations

1.      Get access token

POST https://login.windows.net/[domain]/oauth2/token?api-version=1.0\

Request header:

Content-Type: application/x-www-form-urlencoded

Host: login.windows.net

Content-Length: 184

Expect: 100-continue

Connection: Keep-Alive


Request body:

(url encode for client secret key http://www.albionresearch.com/misc/urlencode.php)

grant_type=client_credentials&resource=[dynamics URI]&client_id=[Client ID registered in Azure]&client_secret=[Secret key generated from Azure]


2. Get Azure Write URL

POST [Dynamics URI]/data/DataManagementDefinitionGroups/Microsoft.Dynamics.DataEntities.GetAzureWriteUrl HTTP/1.1

OData-Version: 4.0

OData-MaxVersion: 4.0

Content-Type: application/json;odata.metadata=minimal

Accept: application/json;odata.metadata=minimal

Accpet-Charset: UTF-8

Authorization: Bearer [access token]

Host: [Dynamics URI without https]


{

    "uniqueFileName":"[New GUID]"

}

3. Upload data package to Blob

PUT [URI returned from GetAzureWriteURL]

 
x-ms-date: Wed, 13 Jun 2018 11:08:00 AST

x-ms-version: 2015-02-21

x-ms-blob-type:BlockBlob

Overwrite: T


@INCLUDE *[folderPath]\[fileName].zip*@

4. Import from package

POST

[Dynamics URL with https]/data/DataManagementDefinitionGroups/Microsoft.Dynamics.DataEntities.ImportFromPackage HTTP/1.1

OData-Version: 4.0

OData-MaxVersion: 4.0

Content-Type: application/json;odata.metadata=minimal

Accept: application/json;odata.metadata=minimal

Accpet-Charset: UTF-8

Authorization: Bearer [access token]

Host: [Dynamics URI without https]


{

    "packageUrl":"[Blob URL returned from GetAzureWriteURL]",

    "definitionGroupId":"XE",

    "executionId":"",

    "execute":true,

    "overwrite":true,

    "legalEntityId":"USMF"

}

5. Get execution summary status

POST

[Dynamics URL with https]/data/DataManagementDefinitionGroups/Microsoft.Dynamics.DataEntities.GetExecutionSummaryStatus HTTP/1.1

OData-Version: 4.0

OData-MaxVersion: 4.0

Content-Type: application/json;odata.metadata=minimal

Accept: application/json;odata.metadata=minimal

Accpet-Charset: UTF-8

Authorization: Bearer [access token]

Host: [Dynamics URL without https]


{

    "executionId":"[execution id returned from Import from Package HTTP call]"

}

Export file from Dynamics 365 Operations

1. Export to package

POST [Dynamics URL with https]/data/DataManagementDefinitionGroups/Microsoft.Dynamics.DataEntities.ExportToPackage HTTP/1.1
OData-Version: 4.0
OData-MaxVersion: 4.0
Content-Type: application/json;odata.metadata=minimal
Accept: application/json;odata.metadata=minimal
Accpet-Charset: UTF-8
Authorization: Bearer [access token]
Host: [Dynamics URL without https]

{
  "definitionGroupId":"GJ Export",
  "packageName":"General journal",
  "executionId":"",
  "reExecute":false,
  "legalEntityId":"USMF"
}

2. Get exported package URL

POST [Dynamics URL with https]
/data/DataManagementDefinitionGroups/Microsoft.Dynamics.DataEntities.GetExportedPackageUrl HTTP/1.1
OData-Version: 4.0
OData-MaxVersion: 4.0
Content-Type: application/json;odata.metadata=minimal
Accept: application/json;odata.metadata=minimal
Accpet-Charset: UTF-8
Authorization: Bearer [access token]
Host: [Dynamics URL without https]


{
     "executionId":"ExportPackage-6/14/2018 08:04:43 am[returned from export to package]"
}

Dynamics 365 Operations | Recurring integration - REST | Package API

First thing first, learn basics of Recurring integration from below URL:

Download data [Dequeue]

Setup recurring integration export project

  1. In the System administration workspace (not the System administration module), select the Data Management IT workspace.
  2. In the work space, on the Recurring data job tab, select the recurring job to view the details. The Manage scheduled data jobs page contains a grid that lists any messages that are waiting in the queue. Therefore, you can monitor messages and the processing status.

In code snippets below GUID for recurring integration means:

Activity ID, on the Manage scheduled data jobs page, ID field [GUID]

Export data

GET [Dynamics URI with https]/api/connector/dequeue/[GUID for recurring integration] HTTP/1.1
OData-Version: 4.0
OData-MaxVersion: 4.0
Content-Type: application/json;odata.metadata=minimal
Accept: application/json;odata.metadata=minimal
Accpet-Charset: UTF-8
Authorization: Bearer [access token]
Host: [Dynamics URI without https]

Download data package

GET [URI return from dequeue request] HTTP/1.1
OData-Version: 4.0
OData-MaxVersion: 4.0
Content-Type: application/json;odata.metadata=minimal
Accept: application/json;odata.metadata=minimal
Accpet-Charset: UTF-8
Authorization: Bearer [access token]
Host: [Dynamics URI without https]

Acknowledge data package download

POST [Dynamics URI with https]
/api/connector/ack/[GUID for recurring integration] HTTP/1.1
OData-Version: 4.0
OData-MaxVersion: 4.0
Content-Type: application/json;odata.metadata=minimal
Accept: application/json;odata.metadata=minimal
Accpet-Charset: UTF-8
Authorization: Bearer [access token]
Host: [Dynamics URI without https]
{
  "CorrelationId": "[return from dequeue]",
  "PopReceipt": "[return from dequeue]",
  "DownloadLocation": "[location from dequeue]"
}


Upload data [Enqueue]

POST [Dynamics URI with https]/api/connector/enqueue/[guid for recurring integration]?entity=General%20journal&company=usmf HTTP/1.1
OData-Version: 4.0
OData-MaxVersion: 4.0
Accept: application/json;odata.metadata=minimal
Accpet-Charset: UTF-8
Authorization: Bearer [access token]
Host: [Dynamics URI without https]

Request body {xml data}

Get message status

POST /data/DataManagementDefinitionGroups/Microsoft.Dynamics.DataEntities.GetMessageStatus
BODY
{
    "messageId":""
}

Dynamics 365 Operations | How to debug & restart AOS with limited administrator privileges

Environment with limited administrator privileges.

Debug

  1. D365 menu > Options > untick "Load symbols only for items in the solution"
  2. Setup a startup object.
  3. Run
  4. Go back to VS > debug > attach to process > iisexpress > attach.

Restart AOS\IIS

VS > D365 menu > Restart IIS express.

Environment where we do have administrator privileges.

  1. D365 menu > Options > untick Load symbols only for items in the solution.
  2. Setup a startup object.
  3. Run
  4. Go back to VS > debug > attach to process > show processes from all users > w3wp > attach.