Translate

Saturday, June 16, 2012

Creating Vendors thru X++ in AX 2012

Creating Vendors thru X++ in AX 2012


1.
//Create party for the vendor
public void createParty(VendorRequestCreate          _vendorRequestCreate)
{
    ;
    if(_vendorRequestCreate.DirPartyType        == DirPartyBaseType::Person)
    {
        dirPerson.Name                          = _vendorRequestCreate.VendorName;
        dirPerson.NameAlias                     = _vendorRequestCreate.FirstName;
        dirPerson.NameSequence                  = dirNameSequence::find('First Last').RecId;
        dirPerson.insert();

        dirPersonName.FirstName                 = _vendorRequestCreate.FirstName;
        dirPersonName.MiddleName                = _vendorRequestCreate.MiddleName;
        dirPersonName.LastName                  = _vendorRequestCreate.LastName;
        dirPersonName.ValidFrom                 = DateTimeUtil::newDateTime(systemDateGet(),str2time ('00:00:00'),DateTimeUtil::getUserPreferredTimeZone());
        dirPersonName.ValidTo                   = DateTimeUtil::maxValue();
        dirPersonName.Person                    = dirPerson.RecId;
        dirPersonName.insert();

        dirParty                                = new DirParty(dirPerson);
    }
    else
    {
        dirOrganisation.Name                    = _vendorRequestCreate.VendorName;
        dirOrganisation.NameAlias               = _vendorRequestCreate.FirstName;
        dirOrganisation.LanguageId              = 'EN-US';
        dirOrganisation.KnownAs                 = _vendorRequestCreate.VendorName;
        dirOrganisation.PhoneticName            = _vendorRequestCreate.VendorName;
        dirOrganisation.insert();

        dirParty                                = new DirParty(dirOrganisation);
    }

}


2.

//Create vendor and associate with vendor
public void convertToVendor(VendorRequestCreate          _vendorRequestCreate)
{
    VendorRequestCreate                  vendorRequestCreate = VendorRequestCreate::find(_vendorRequestCreate.VendorNo,true);
    ;

    if(_vendorRequestCreate.DirPartyType    == DirPartyBaseType::Person)
        vendTable.Party         = dirPerson.RecId;
    else
        vendTable.Party         = dirOrganisation.RecId;

    ttsBegin;
    vendTable.AccountNum    = NumberSeq::newGetNum(VendParameters::numRefVendAccount()).num();
    ttsCommit;
    if(vendTable.AccountNum == '')
        vendTable.AccountNum= int2str(_vendorRequestCreate.VendorNo);

    vendTable.Currency      = _vendorRequestCreate.CurrencyCode;
    vendTable.VendGroup     = _vendorRequestCreate.VendGroupId;
    vendTable.PaymTermId    = _vendorRequestCreate.PaymTermId;
    vendTable.DefaultDimension = _vendorRequestCreate.DefaultDimension;
    vendTable.OneTimeVendor = _vendorRequestCreate.OneTimeSupplier;
    vendTable.PaymMode      = _vendorRequestCreate.PaymMode;
    vendTable.BankAccount   = _vendorRequestCreate.BankAccount;
    vendTable.WI_Remarks    = _vendorRequestCreate.Remarks;
    vendTable.WI_DepartmentEmail = _vendorRequestCreate.DepartmentEmail;
    vendTable.insert();

    this.createPostalAddress(_vendorRequestCreate);
    this.createCommAddress(_vendorRequestCreate);
    this.createBankDetails(_vendorRequestCreate,vendTable.AccountNum);
    this.createContact(_vendorRequestCreate,vendTable.Party);

    if(vendTable.RecId)
    {
        vendorRequestCreate.VendAccount = vendTable.AccountNum;
        vendorRequestCreate.update();
        info(strFmt('Vendor %1 has been successfully created',vendTable.AccountNum));
    }

}


3.

//Create postal address
public void createPostalAddress(VendorRequestCreate          _vendorRequestCreate)
{
    VendorRequestAddress             vendorRequestAddress;
    DirPartyPostalAddressView           dirPartyPostalAddressView;
    ;

    select Addressing, LogisticsAddressCity, LogisticsAddressCountryRegionId, LogisticsAddressStateId,
            LogisticsAddressZipCodeId from vendorRequestAddress
        where vendorRequestAddress.WI_VendorRequestCreate       == _vendorRequestCreate.RecId;

    // Create postal address
    if(dirPerson.RecId || dirOrganisation.RecId)
    {
        dirPartyPostalAddressView.LocationName                  = 'Primary business';
        dirPartyPostalAddressView.Address                       = vendorRequestAddress.Addressing;
        dirPartyPostalAddressView.City                          = vendorRequestAddress.LogisticsAddressCity;
        dirPartyPostalAddressView.ZipCode                       = vendorRequestAddress.LogisticsAddressZipCodeId;
        dirPartyPostalAddressView.State                         = vendorRequestAddress.LogisticsAddressStateId;
        dirPartyPostalAddressView.Street                        = vendorRequestAddress.Addressing;
        //dirPartyPostalAddressView.Street                        = 'Dover Street';
        //dirPartyPostalAddressView.StreetNumber                  = '123';
        dirPartyPostalAddressView.CountryRegionId               = vendorRequestAddress.LogisticsAddressCountryRegionId;

        dirParty.createOrUpdatePostalAddress(dirPartyPostalAddressView);
    }

}


4.
//Create communication details
public void createCommAddress(VendorRequestCreate          _vendorRequestCreate)
{

    VendorRequestCommunication       vendorRequestCommunication;
    ;

    select Phone1, Phone2, Email, Fax from vendorRequestCommunication
            where vendorRequestCommunication.WI_VendorRequestCreate == _vendorRequestCreate.RecId;

    //Phone 1
    if(vendorRequestCommunication.Phone1 != '' && vendTable.Party != 0)
    {
        logisticsLocation.clear();
        logisticsLocation   = LogisticsLocation::create('Phone', NoYes::No);

        dirPartyContactInfoView.LocationName                = 'Primay Phone 1';
        dirPartyContactInfoView.Locator                     = vendorRequestCommunication.Phone1;
        dirPartyContactInfoView.Type                        = LogisticsElectronicAddressMethodType::Phone;
        dirPartyContactInfoView.Party                       = vendTable.Party;
        dirPartyContactInfoView.IsPrimary                   = NoYes::Yes;
        dirParty.createOrUpdateContactInfo(dirPartyContactInfoView);
    }

    //Phone 2
    if(vendorRequestCommunication.Phone2 != '' && vendTable.Party != 0)
    {
        logisticsLocation.clear();
        logisticsLocation   = LogisticsLocation::create('Phone', NoYes::No);

        dirPartyContactInfoView.LocationName                = 'Primay Phone 2';
        dirPartyContactInfoView.Locator                     = vendorRequestCommunication.Phone2;
        dirPartyContactInfoView.Type                        = LogisticsElectronicAddressMethodType::Phone;
        dirPartyContactInfoView.Party                       = vendTable.Party;
        dirPartyContactInfoView.IsPrimary                   = NoYes::No;
        dirParty.createOrUpdateContactInfo(dirPartyContactInfoView);
    }

    //Email
    if(vendorRequestCommunication.Email != '' && vendTable.Party != 0)
    {
        logisticsLocation.clear();
        logisticsLocation   = LogisticsLocation::create('Phone', NoYes::No);

        dirPartyContactInfoView.LocationName                = 'Primay Email';
        dirPartyContactInfoView.Locator                     = vendorRequestCommunication.Email;
        dirPartyContactInfoView.Type                        = LogisticsElectronicAddressMethodType::Email;
        dirPartyContactInfoView.Party                       = vendTable.Party;
        dirPartyContactInfoView.IsPrimary                   = NoYes::Yes;
        dirParty.createOrUpdateContactInfo(dirPartyContactInfoView);
    }

    //Fax
    if(vendorRequestCommunication.Fax != '' && vendTable.Party != 0)
    {
        logisticsLocation.clear();
        logisticsLocation   = LogisticsLocation::create('Phone', NoYes::No);

        dirPartyContactInfoView.LocationName                = 'Primay Fax';
        dirPartyContactInfoView.Locator                     = vendorRequestCommunication.Fax;
        dirPartyContactInfoView.Type                        = LogisticsElectronicAddressMethodType::Fax;
        dirPartyContactInfoView.Party                       = vendTable.Party;
        dirPartyContactInfoView.IsPrimary                   = NoYes::Yes;
        dirParty.createOrUpdateContactInfo(dirPartyContactInfoView);
    }
}


5.
//Create bank details for the vendor
private void createBankDetails(WI_VendorRequestCreate          _vendorRequestCreate,
                               VendAccount                     _vendAcc)
{
    VendBankAccount         vendBankAccount;
    LogisticsLocation       lLogisticsLocation;
    LogisticsPostalAddress  logisticsPostalAddress;

    ;

    ttsBegin;

    lLogisticsLocation.Description      = _vendorRequestCreate.FirstName;
    lLogisticsLocation.insert();

    logisticsPostalAddress.Street       = _vendorRequestCreate.VendBankAddress;
    logisticsPostalAddress.Address      = _vendorRequestCreate.VendBankAddress;
    logisticsPostalAddress.Location     = lLogisticsLocation.RecId;
    logisticsPostalAddress.insert();

    vendBankAccount.AccountID           = subStr(_vendorRequestCreate.BankAccount,1,10);
    vendBankAccount.Name                = _vendorRequestCreate.BankAccount;
    vendBankAccount.AccountNum          = _vendorRequestCreate.BankAccountNum;
    vendBankAccount.VendAccount         = _vendAcc;
    vendBankAccount.CurrencyCode        = _vendorRequestCreate.CurrencyCode;
    vendBankAccount.BankGroupID         = BankAccountTable::find(vendBankAccount.AccountID).BankGroupId;
    vendBankAccount.Location            = lLogisticsLocation.RecId;
    vendBankAccount.WI_BeneficiaryName  = _vendorRequestCreate.BeneficiaryName;
    vendBankAccount.initFromBankGroup(BankGroup::find(vendBankAccount.BankGroupID));

    vendBankAccount.insert();
    ttsCommit;
}

6.
//Create contact for the vendor
private void createContact(VendorRequestCreate       _vendorRequestCreate,
                           RefRecId                     _partyId)
{
    ContactPerson           contactPerson;
    DirPersonName           lDirPersonName;
    DirPerson               lDirPerson;
    DirParty                lDirParty;
    LogisticsLocation       lLogisticsLocation;
    DirPartyContactInfoView             lDirPartyContactInfoView;
    ;

    //Create party for Contact
    lDirPerson.Name                          = _vendorRequestCreate.ContactPersonName;
    lDirPerson.NameAlias                     = _vendorRequestCreate.ContactPersonName;
    lDirPerson.NameSequence                  = dirNameSequence::find('First Last').RecId;
    lDirPerson.insert();

    lDirPersonName.FirstName                 = _vendorRequestCreate.ContactPersonName;
    //lDirPersonName.MiddleName                = _vendorRequestCreate.ContactPersonName;
    //lDirPersonName.LastName                  = _vendorRequestCreate.LastName;
    lDirPersonName.ValidFrom                 = DateTimeUtil::newDateTime(systemDateGet(),str2time ('00:00:00'),DateTimeUtil::getUserPreferredTimeZone());
    lDirPersonName.ValidTo                   = DateTimeUtil::maxValue();
    lDirPersonName.Person                    = lDirPerson.RecId;
    lDirPersonName.insert();

    lDirParty                                = new DirParty(lDirPerson);

    //Create contact and associate with party
    contactPerson.ContactForParty           = vendTable.Party;
    contactPerson.Party                     = lDirPerson.RecId;
    contactPerson.insert();

    //Create contact number
    if(_vendorRequestCreate.ContactPersonNo != '')
    {
        lLogisticsLocation.clear();
        lLogisticsLocation                  = LogisticsLocation::create('Phone', NoYes::No);

        lDirPartyContactInfoView.LocationName                = 'Primay Phone';
        lDirPartyContactInfoView.Locator                     = _vendorRequestCreate.ContactPersonNo;
        lDirPartyContactInfoView.Type                        = LogisticsElectronicAddressMethodType::Phone;
        lDirPartyContactInfoView.Party                       = contactPerson.Party;
        lDirPartyContactInfoView.IsPrimary                   = NoYes::Yes;
        lDirParty.createOrUpdateContactInfo(lDirPartyContactInfoView);
    }

}

Product Information Management AX 2012

Hi All,

These days I have been a lot dealing with Products in AX 2012. In AX 2012 Inventory structure has been completely changed. So in brief we can understand the same as:


Understanding the Product structure:


Product type
·         Item type - This option will be selected if the product is an inventoried product
·         Service type - This option will be selected if the product is a non-inventoried product

Product sub type
·         Product master - Products of this sub-type must have a product dimension group that specifies the product dimensions that are active for the product (color, size, and configuration)
o    Configuration technology
§  Predefined variant - This type should be chosen if the product will not be configured, but simply rely on the user’s choice of Color, and/or Size, and/or Configuration for each transaction
§  Dimension-based configuration - This type should be chosen if the user will build a configurable BOM that relies on configuration rules to build the Config ID and the BOM lines. (This technology may only be chosen if Configuration is active on the Product dimension group selected for the product)
§  Rule-based configuration - This type should be chosen if the product will use Product builder
§  Constraint-based configuration - This type should be chosen if the product will use the new AX 2009 Constraint based product configuration method. (This technology may only be chosen if Configuration is active and is the lone Product dimension active for the Product dimension group selected for the product)
·         Product - Products of this sub-type do NOT have any product dimensions, and therefore do not have a product dimension group
·         Product variant - A large amount of information may be maintained at the Product master level, including, but not limited to:
o    Product dimensions
o    Images
o    Product categories
o    Product attributes
o   Unit conversions
For Product master products, Product dimensions and Product variants are extremely important. Both may be managed from menu items in the ribbons section of the Products form:

Dimensions
·         Product dimensions: Color, Size, Configuration
·         Storage dimensions: Site, Warehouse, Location, Pallet ID
·         Tracking dimensions: Batch number, Serial number

Release product
Once product variants have been created at the instance level, they must be released to individual companies before transactions may be performed in the respective company. Variants may be released from any of the Products forms (All, Distinct, Product masters), or from the Product variants form by clicking Release products in the ribbon section of the form. 

Tech part (Data model)
AX 2012 Item AIF Web Service (InventItemService) 
Table Name
Table Description
EcoResProduct
The EcoResProduct table stores products and is the base table in the products hierarchy.
EcoResProductMaster
The EcoResProductMaster table stores product masters.
EcoResProductIdentifier
The EcoResProductIdentifier table contains a product identification that is available for users.
EcoResDistinctProduct
The EcoResDistinctProduct table stores products.
EcoResDistinctProductVariant
The EcoResDistinctProductVariant table stores product variants.
EcoResProductDimensionGroup
The EcoResProductDimensionGroup table contains information about a dimension group.
EcoResProductDimensionGroupProduct
The EcoResProductDimensionGroupProduct table stores information about relationships between products and dimension groups.
EcoResColor
The EcoResColor table stores color names.
EcoResSize
The EcoResSize table stores size names.
EcoResConfiguration
The EcoResConfiguration table stores configuration names.
EcoResProductMasterColor
The EcoResProductMasterColor table stores information about colors assigned to product masters.
EcoResProductMasterSize
The EcoResProductMasterSize table stores information about sizes that are assigned to product masters.
EcoResProductMasterConfiguration
The EcoResProductMasterConfiguration table stores information about configurations assigned to product masters.
EcoResProductVariantColor
The EcoResProductVariantColor table stores information about the colors that are assigned to product variants.
EcoResProductVariantSize
The EcoResProductVariantSize table stores information about the sizes that are assigned to product variants.
EcoResProductVariantConfiguration
The EcoResProductVariantConfiguration table stores information about the configurations that are assigned to product variants.
EcoResProductMasterDimensionValue
The EcoResProductMasterDimensionValue table is the base table in the product model dimension hierarchy.
EcoResProductVariantDimensionValue
The EcoResProductVariantDimensionValue table is the base table in the product variant dimension hierarchy.
EcoResProductDimensionAttribute
The EcoResProductDimensionAttribute table contains definitions of product dimension attributes (categories).
EcoResInstanceValue
The EcoResInstanceValue table contains the definitions of the instances of the components or products.
EcoResProductInstanceValue
The EcoResProductInstanceValue table contains definitions of values for the instances of attributes of a product.
InventTable
The InventTable table contains information about items.
InventTableModule
The InventTableModule table contains information about purchase, sales, and inventory specific settings for items.
InventItemLocation
The InventItemLocation table contains information about items and the related warehouse and counting settings. The settings can be made specific based on the items configuration and vary from warehouse to warehouse.
InventItemSalesSetup
The InventItemSalesSetup table contains the default settings for items, such as site and warehouse. The values are related to sales settings.
InventItemInventSetup
The InventItemInventSetup table contains the default settings for items, such as site and warehouse. The values are related to inventory settings.
InventItemPurchSetup
The InventItemPurchSetup table contains the default settings for items, such as site and warehouse. The values are related to purchase settings.
InventItemSetupSupplyType
The InventItemSetupSupplyType table contains information about the sourcing of items.
InventDim
The InventDim table contains values for inventory dimensions.
InventDimCombination
The InventDimCombination table contains variants of items. The variants are created as product variants that are based on product dimensions such as size, color, and configuration. These variants are replicated to the legal entity.

For extended info use the below articles to import\integrate Products using AIF services. 

Cheers… J 

Thursday, June 14, 2012

AX 2012 Workflow Customization

Hi Guys,

During these I have working with customisation of Workflows in AX 2012. AX 2012 provides a bunch of APIs which are really easy to use it and create new workflow in AX 2012.

Just you can follow the steps in attached file.

Happy DAXing.. :)

Segmented Entry Control on Forms in Dynamics AX 2012 [Ledger Dimension/Ledger account lookup X++]

Friends,
I was going through the segmented entry control on the form and found that AX 2012 has changed the way ledger dimensions populate on the form.
A new control type has been added in AX 2012 as shown below.
You can add a segmented entry control to a form when you want that form to show an account number and related dimensions from the chart of accounts. In addition, you use the segmented entry control to associate an account and related financial dimensions with the record that appears in the form. To update the values in the control, you can use a lookup or a list of recently used values to select a value for each segment. Finally, you can have the control validate the updated segments to ensure the account and financial dimensions are a valid combination[msdn]
For more information : click here
Let me show you how to quickly get this working on the form.
To explain this, I am using ProjParameters Table.
Add a new Int64 field to ProjParameters Table by name “LedgerDimension”
and set the extendedDataType as “LedgerDimensionAccount”
Add a new relation with “DimensionAttributeValueCombination” table.Right click on the relations Node >> New relation and set the relations as shown below
Now create a normal relation as shown below. Right click on the newly created relations and chose Normal relation.

we are done with the table customization and lets move to the form “ProjParameters”
Go to AOT >> Forms >> ProjParameters >> right click on the form and restore.
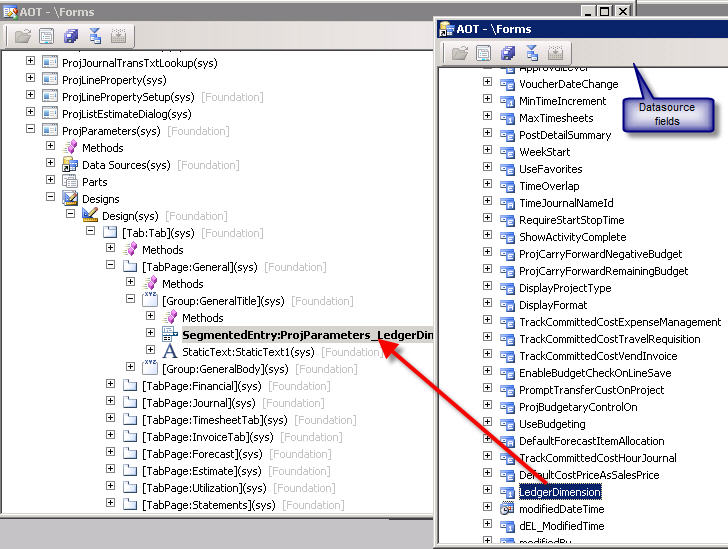
Expand the datasources node >> projParameters >> Drag and drop the LedgerDimension field on to Design >> General TabPage as shown below.
Once you drag drop this datafield ledgerDimension, a new segmentedEntry control will be created. Save the form and open the form [Ctrl + O].
you will find the ledger account control in the General Tab. But when you try to look at the ledger accounts, you will not find anything[empty - no lookup values]..

hmm.. interesting..what am I missing here?? Let me help you how to get this..
In AX 2012, there is a class “LedgerDimensionAccountController” which does the trick of population of accounts. LedgerDimensionAccountController class provides control interaction logic for any use of the account number control in the UI.
Lets proceed. Go to the classdeclaration and create an object for LedgerDimensionAccountController class as shown below
public class FormRun extends ObjectRun
{
//..standard code
LedgerDimensionAccountController ledgerDimensionAccountController;
}
Override the init() method of the form and instantiate the object of the class as shown below with the projparameters_ds and the field name “LedgerDimension”
public void init()
{
//…standard code
// Initialize account controllers
ledgerDimensionAccountController = LedgerDimensionAccountController::construct(projParameters_DS, fieldstr(ProjParameters, LedgerDimension));
}
Go to datasources >> projParameters >> fields >> ledgerDimension >> add a new method called resolvereference as shown below
public Common resolveReference(FormReferenceControl _formReferenceControl)
{
return ledgerDimensionAccountController.resolveReference();
}

After you add the control to the form, you must provide the control with the ability to retrieve data, select a value for a segment, and validate the selected values. Typically, you use a controller class to override several segmented entry control methods.
Now, expand Design node >> segmented Entry control which has been recently created >> right click and override the “jumpref” method and add the below code
public void jumpRef()
{
ledgerDimensionAccountController.jumpRef();
super();
}
Right click again on th segmented entry control and override “loadAutoCompleteData” method and add the below code
Public void loadAutoCompleteData(loadAutoCompleteDataEventArgs _e)
{
super(_e);
ledgerDimensionAccountController.loadAutoCompleteData(_e);
}
Right click again on the segmented control and override “loadsegments” method and add the below code
public void loadSegments()
{
super();
ledgerDimensionAccountController.parmControl(this);
ledgerDimensionAccountController.loadSegments();
}
Right click on the segmented entry control and override “segmentValueChanged” and add the below code
public void segmentValueChanged(SegmentValueChangedEventArgs _e)
{
super(_e);
ledgerDimensionAccountController.segmentValueChanged(_e);
}
Lastly , right click on the segmented control and override “validate” method and add the code below
public boolean validate()
{
boolean isValid;
isValid = super();
isValid = ledgerDimensionAccountController.validate() && isValid;
return isValid;
}
For more details on the overridden methods above : click here
Done, we are good now to see the ledger accounts with the segments [if any] in the lookup.
Right click on the projParameters form and open the form.
Happy DAXing.. :)

Wednesday, May 23, 2012

Add a Segmented Entry Control to a Form [AX 2012]

Add a Segmented Entry Control to a Form [AX 2012]
You can use a segmented entry control to view or update an account number from the chart of accounts. You use the LedgerDimensionAccountController class to provide the actions that are used with this kind of account. For more information about how to add multi-segment account numbers to forms, see Segmented Entry. The following sections describe how to add a data source for a segmented entry control, how to add the control, and then how to add actions.

To Add the Data Source to the Form

  1. In the AOT, expand Forms. Find and expand the form where you want to add a financial account field. Expand the Data Sources node of the form.
  2. Press Ctrl + D to open a second AOT. Expand Data Dictionary, expand Tables, and then click the table that contains the field you want to appear on the form.
    ImportantImportant
    When you bind the field to a segmented entry control, you should verify that the ExtendedDataType property of the field is set to LedgerDimensionAccount. In addition, you should verify that the field is part of a table relation to the DimensionAttributeValueCombination table.
  3. Drag the table to the Data Sources node of the form. The table is added to the form data sources.

To Add the Segmented Entry Control to the Form

  1. Expand the Designs node of the form.
  2. Expand the Data Sources node of the form, expand the table, expand Fields, and then drag the field that represents the multi-segment account number to the Design node of the form. A segmented entry control is added to the form.
    You can also right-click Design, click New Control, click SegmentedEntry, and then populate the DataSource and ReferenceField properties of the control.

To Add Actions to the Segmented Entry Control

  1. Expand the Methods node of the form, right-click ClassDeclaration, and then click View Code. The method opens in the code editor. Add an instance of the LedgerDimensionAccountController class to the form. The following code example adds a declaration for the class.

    public class FormRun extends ObjectRun
    {
        LedgerDimensionAccountController ledgerDimensionAccountController;
    }


  2. Right-click the Methods node of the form, click Override method, and then click init. The init method opens in the code editor. Create an instance of the LedgerDimensionAccountController class and specify the data source and field that you want to associate with the segmented entry control.
    The following code example instantiates the class. Notice how the parameters specify the LedgerJournalTrans table as the data source and LedgerDimension as the field.

    public void init()
    {
        super();
        
        ledgerDimensionAccountController = LedgerDimensionAccountController::construct(LedgerJournalTrans_DS, fieldstr(LedgerJournalTrans, LedgerDimension));
    }


  3. Expand the Data Sources node of the form, expand the data source table, expand Fields, and then expand the field that you want to appear on the form. Right-click Methods, click Override method, and then click resolveReference. The method opens in the code editor. Replace the existing code in the method with a call to the resolveReference method of the LedgerDimensionAccountController class.
    The following code example overrides the resolveReference method of the field. Notice how comments are used to remove the existing code.

    public Common resolveReference(FormReferenceControl _formReferenceControl)
    {
        //Common ret;
        
        //ret = super(_formReferenceControl);
        
        //return ret,
        
        return ledgerDimensionAccountController.resolveReference();
    }


  4. Expand the Design node of the form, expand the segmented entry control that you added, right-click Methods, click Override method, and then click jumpRef. The jumpRef method opens in the code editor. Add a call to the jumpRef method of the LedgerDimensionAccountController class.
    The following code example shows how to override the jumpRef method of the control.

    public void jumpRef()
    {
        ledgerDimensionAccountController.jumpRef();
        
        super();
    }


  5. Right-click Methods of the segmented entry control, click Override method, and then click loadAutoCompleteData. The loadAutoCompleteData method opens in the code editor. Add a call to the loadAutoCompleteData method of the LedgerDimensionAccountController class.
    The following code example shows how to override the loadAutoCompleteData method of the control. Notice how the loadAutoCompleteData method of the LedgerDimensionAccountController uses the input parameter of the control method.

    Public void loadAutoCompleteData(loadAutoCompleteDataEventArgs _e)
    {
        super(_e);
        
        ledgerDimensionAccountController.loadAutoCompleteData(_e);
    }


  6. Right-click the Methods node of the segmented entry control, click Override method, and then click loadSegments. The loadSegments method opens in the code editor. Add a call to the parmControl, parmDimensionAccountStorageUsage, and loadSegments methods of the LedgerDimensionAccountController class.
    The following code example overrides the loadSegments method of the control. Notice the use of the parmControl method. You use this method to bind the instance of the LedgerDimensionAccountController class to the segmented entry control.

    public void loadSegments()
    {
        super();
        
        ledgerDimensionAccountController.parmControl(this);
        ledgerDimensionAccountController.loadSegments();
    }


  7. Right-click the Methods node of the segmented entry control, click Override method, and then click segmentValueChanged. The segmentValueChanged method opens in the code editor. Add a call to the segmentValueChanged method of the LedgerDimensionAcccountController class.
    The following code example shows how to override the segmentValueChanged method of the control. Notice how the segmentValueChanged method of the LedgerDimensionAccountController class uses the input parameter of the control method.

    public void segmentValueChanged(SegmentValueChangedEventArgs _e)
    {
        super(_e);
        
        ledgerDimensionAccountController.segmentValueChanged(_e);
    }


  8. Right-click the Methods node of the segmented entry control, click Override method, and then click validate. The validate method opens in the code editor. Add a call to the validate method of the LedgerDimensionAccountController class. The following code examples shows how to override the validate method of the control.

    public boolean validate()
    {
        boolean ret;
        
        ret = super();
        
        ret = ledgerDimensionAccountController.validate() && ret;
        
        return ret;
    }


  9. Save the form and close the code editor.

    Cheers.. :)

Tuesday, March 27, 2012

Microsoft Dynamics AX - The future Client Win8 / HTML5

Microsoft Dynamics AX - The future Client Win8 / HTML5


Recently I wrote about Microsoft Dynamics AX, and Microsoft in general, specifically focusing around Windows 8 Tablets and the Metro UI. In this focus, I posed the fact, that most likely the future of the AX client will focus around HTML5, as well as XAML. Taking advantage of the Windows 8 Metro UI focus.


Well based on the recently release Microsoft Dynamics AX statement of direction (SOD), it seems that Microsoft has confirmed this educated guess, for the target client of "AX 7".


Taking this further, and my point to a focus around Any Device ERP, Microsoft talks directly to these points with it's focus on the next generation UX:
"Beyond being able to run on any device and anywhere, we are taking a completely new and modern approach to UX through the “Metro” UX experience that customers know from Windows Phone, Windows 8, Xbox, etc.. and we will be investing to support Natural User Interfaces like Speech, Touch and Gestures."

As I've stated in the past, a focus towards such technologies by Partners and Customers is key to building towards the Dynamics of the future. Further, even the design nature of the SOD, being that of Metro style tiles, as well as PartnerSource being redesigned in such a fashion, shows that Microsoft truly is embracing Steve Ballmer's point that the "Metro UI is the Heart & Soul of the Microsoft UX."

This helps further point to my guess, that tools like Visual Studio LightSwitch will enable fast LOB application creation, that can help target the any device concept with UI specific features in the future for Microsoft Metro UI.


As we draw near to Convergence 2012, its important to have this understanding, and to keep a look out from further such announcements from Microsoft. This move builds upon what Microsoft has already done, with it's release of Microsoft Dynamics AX 2012.

For me, this helps sets focus on technology, methodology, design concepts and what to focus on from an educational point of view. I believe Microsoft is taking a right step with this focus, and will help usher in a wave of adoption through such moves, for the Windows 8 Platform. The vision that was put forth some time ago, with 'three screens and a cloud' is finally taking shape, and that includes Microsoft's flagship ERP product: Microsoft Dynamics AX.


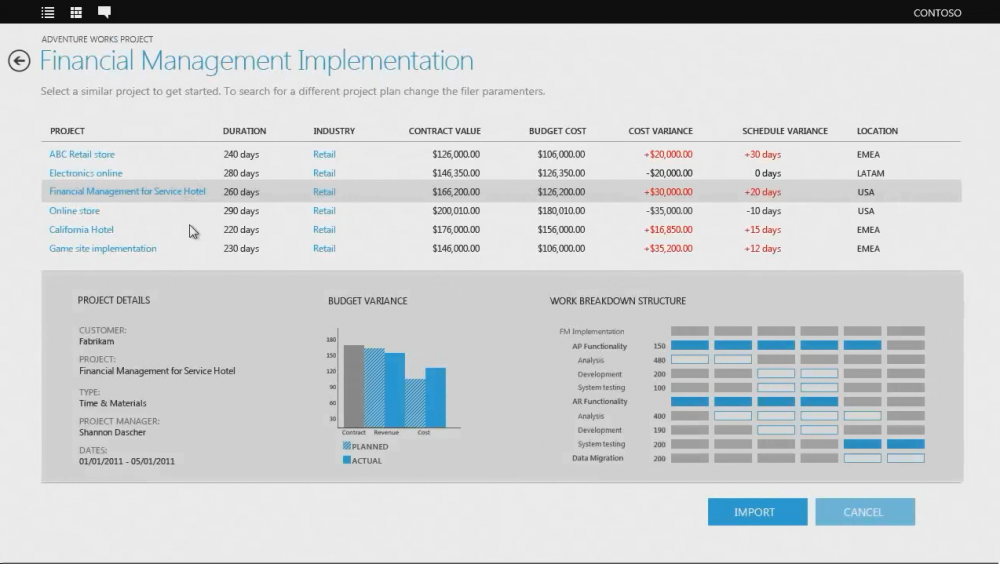
Few more screen shots..


Enjy.. :)