Translate

Thursday, June 14, 2012

AX 2012 Workflow Customization

Hi Guys,

During these I have working with customisation of Workflows in AX 2012. AX 2012 provides a bunch of APIs which are really easy to use it and create new workflow in AX 2012.

Just you can follow the steps in attached file.

Happy DAXing.. :)

Segmented Entry Control on Forms in Dynamics AX 2012 [Ledger Dimension/Ledger account lookup X++]

Friends,
I was going through the segmented entry control on the form and found that AX 2012 has changed the way ledger dimensions populate on the form.
A new control type has been added in AX 2012 as shown below.
You can add a segmented entry control to a form when you want that form to show an account number and related dimensions from the chart of accounts. In addition, you use the segmented entry control to associate an account and related financial dimensions with the record that appears in the form. To update the values in the control, you can use a lookup or a list of recently used values to select a value for each segment. Finally, you can have the control validate the updated segments to ensure the account and financial dimensions are a valid combination[msdn]
For more information : click here
Let me show you how to quickly get this working on the form.
To explain this, I am using ProjParameters Table.
Add a new Int64 field to ProjParameters Table by name “LedgerDimension”
and set the extendedDataType as “LedgerDimensionAccount”
Add a new relation with “DimensionAttributeValueCombination” table.Right click on the relations Node >> New relation and set the relations as shown below
Now create a normal relation as shown below. Right click on the newly created relations and chose Normal relation.

we are done with the table customization and lets move to the form “ProjParameters”
Go to AOT >> Forms >> ProjParameters >> right click on the form and restore.
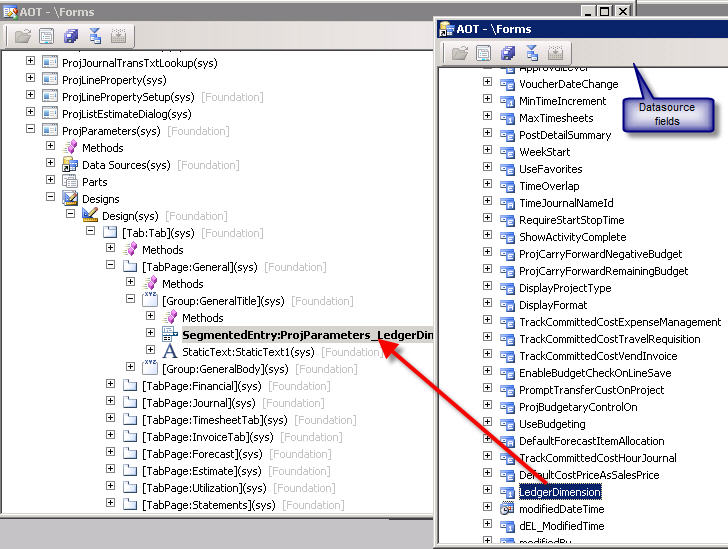
Expand the datasources node >> projParameters >> Drag and drop the LedgerDimension field on to Design >> General TabPage as shown below.
Once you drag drop this datafield ledgerDimension, a new segmentedEntry control will be created. Save the form and open the form [Ctrl + O].
you will find the ledger account control in the General Tab. But when you try to look at the ledger accounts, you will not find anything[empty - no lookup values]..

hmm.. interesting..what am I missing here?? Let me help you how to get this..
In AX 2012, there is a class “LedgerDimensionAccountController” which does the trick of population of accounts. LedgerDimensionAccountController class provides control interaction logic for any use of the account number control in the UI.
Lets proceed. Go to the classdeclaration and create an object for LedgerDimensionAccountController class as shown below
public class FormRun extends ObjectRun
{
//..standard code
LedgerDimensionAccountController ledgerDimensionAccountController;
}
Override the init() method of the form and instantiate the object of the class as shown below with the projparameters_ds and the field name “LedgerDimension”
public void init()
{
//…standard code
// Initialize account controllers
ledgerDimensionAccountController = LedgerDimensionAccountController::construct(projParameters_DS, fieldstr(ProjParameters, LedgerDimension));
}
Go to datasources >> projParameters >> fields >> ledgerDimension >> add a new method called resolvereference as shown below
public Common resolveReference(FormReferenceControl _formReferenceControl)
{
return ledgerDimensionAccountController.resolveReference();
}

After you add the control to the form, you must provide the control with the ability to retrieve data, select a value for a segment, and validate the selected values. Typically, you use a controller class to override several segmented entry control methods.
Now, expand Design node >> segmented Entry control which has been recently created >> right click and override the “jumpref” method and add the below code
public void jumpRef()
{
ledgerDimensionAccountController.jumpRef();
super();
}
Right click again on th segmented entry control and override “loadAutoCompleteData” method and add the below code
Public void loadAutoCompleteData(loadAutoCompleteDataEventArgs _e)
{
super(_e);
ledgerDimensionAccountController.loadAutoCompleteData(_e);
}
Right click again on the segmented control and override “loadsegments” method and add the below code
public void loadSegments()
{
super();
ledgerDimensionAccountController.parmControl(this);
ledgerDimensionAccountController.loadSegments();
}
Right click on the segmented entry control and override “segmentValueChanged” and add the below code
public void segmentValueChanged(SegmentValueChangedEventArgs _e)
{
super(_e);
ledgerDimensionAccountController.segmentValueChanged(_e);
}
Lastly , right click on the segmented control and override “validate” method and add the code below
public boolean validate()
{
boolean isValid;
isValid = super();
isValid = ledgerDimensionAccountController.validate() && isValid;
return isValid;
}
For more details on the overridden methods above : click here
Done, we are good now to see the ledger accounts with the segments [if any] in the lookup.
Right click on the projParameters form and open the form.
Happy DAXing.. :)

Wednesday, May 23, 2012

Add a Segmented Entry Control to a Form [AX 2012]

Add a Segmented Entry Control to a Form [AX 2012]
You can use a segmented entry control to view or update an account number from the chart of accounts. You use the LedgerDimensionAccountController class to provide the actions that are used with this kind of account. For more information about how to add multi-segment account numbers to forms, see Segmented Entry. The following sections describe how to add a data source for a segmented entry control, how to add the control, and then how to add actions.

To Add the Data Source to the Form

  1. In the AOT, expand Forms. Find and expand the form where you want to add a financial account field. Expand the Data Sources node of the form.
  2. Press Ctrl + D to open a second AOT. Expand Data Dictionary, expand Tables, and then click the table that contains the field you want to appear on the form.
    ImportantImportant
    When you bind the field to a segmented entry control, you should verify that the ExtendedDataType property of the field is set to LedgerDimensionAccount. In addition, you should verify that the field is part of a table relation to the DimensionAttributeValueCombination table.
  3. Drag the table to the Data Sources node of the form. The table is added to the form data sources.

To Add the Segmented Entry Control to the Form

  1. Expand the Designs node of the form.
  2. Expand the Data Sources node of the form, expand the table, expand Fields, and then drag the field that represents the multi-segment account number to the Design node of the form. A segmented entry control is added to the form.
    You can also right-click Design, click New Control, click SegmentedEntry, and then populate the DataSource and ReferenceField properties of the control.

To Add Actions to the Segmented Entry Control

  1. Expand the Methods node of the form, right-click ClassDeclaration, and then click View Code. The method opens in the code editor. Add an instance of the LedgerDimensionAccountController class to the form. The following code example adds a declaration for the class.

    public class FormRun extends ObjectRun
    {
        LedgerDimensionAccountController ledgerDimensionAccountController;
    }


  2. Right-click the Methods node of the form, click Override method, and then click init. The init method opens in the code editor. Create an instance of the LedgerDimensionAccountController class and specify the data source and field that you want to associate with the segmented entry control.
    The following code example instantiates the class. Notice how the parameters specify the LedgerJournalTrans table as the data source and LedgerDimension as the field.

    public void init()
    {
        super();
        
        ledgerDimensionAccountController = LedgerDimensionAccountController::construct(LedgerJournalTrans_DS, fieldstr(LedgerJournalTrans, LedgerDimension));
    }


  3. Expand the Data Sources node of the form, expand the data source table, expand Fields, and then expand the field that you want to appear on the form. Right-click Methods, click Override method, and then click resolveReference. The method opens in the code editor. Replace the existing code in the method with a call to the resolveReference method of the LedgerDimensionAccountController class.
    The following code example overrides the resolveReference method of the field. Notice how comments are used to remove the existing code.

    public Common resolveReference(FormReferenceControl _formReferenceControl)
    {
        //Common ret;
        
        //ret = super(_formReferenceControl);
        
        //return ret,
        
        return ledgerDimensionAccountController.resolveReference();
    }


  4. Expand the Design node of the form, expand the segmented entry control that you added, right-click Methods, click Override method, and then click jumpRef. The jumpRef method opens in the code editor. Add a call to the jumpRef method of the LedgerDimensionAccountController class.
    The following code example shows how to override the jumpRef method of the control.

    public void jumpRef()
    {
        ledgerDimensionAccountController.jumpRef();
        
        super();
    }


  5. Right-click Methods of the segmented entry control, click Override method, and then click loadAutoCompleteData. The loadAutoCompleteData method opens in the code editor. Add a call to the loadAutoCompleteData method of the LedgerDimensionAccountController class.
    The following code example shows how to override the loadAutoCompleteData method of the control. Notice how the loadAutoCompleteData method of the LedgerDimensionAccountController uses the input parameter of the control method.

    Public void loadAutoCompleteData(loadAutoCompleteDataEventArgs _e)
    {
        super(_e);
        
        ledgerDimensionAccountController.loadAutoCompleteData(_e);
    }


  6. Right-click the Methods node of the segmented entry control, click Override method, and then click loadSegments. The loadSegments method opens in the code editor. Add a call to the parmControl, parmDimensionAccountStorageUsage, and loadSegments methods of the LedgerDimensionAccountController class.
    The following code example overrides the loadSegments method of the control. Notice the use of the parmControl method. You use this method to bind the instance of the LedgerDimensionAccountController class to the segmented entry control.

    public void loadSegments()
    {
        super();
        
        ledgerDimensionAccountController.parmControl(this);
        ledgerDimensionAccountController.loadSegments();
    }


  7. Right-click the Methods node of the segmented entry control, click Override method, and then click segmentValueChanged. The segmentValueChanged method opens in the code editor. Add a call to the segmentValueChanged method of the LedgerDimensionAcccountController class.
    The following code example shows how to override the segmentValueChanged method of the control. Notice how the segmentValueChanged method of the LedgerDimensionAccountController class uses the input parameter of the control method.

    public void segmentValueChanged(SegmentValueChangedEventArgs _e)
    {
        super(_e);
        
        ledgerDimensionAccountController.segmentValueChanged(_e);
    }


  8. Right-click the Methods node of the segmented entry control, click Override method, and then click validate. The validate method opens in the code editor. Add a call to the validate method of the LedgerDimensionAccountController class. The following code examples shows how to override the validate method of the control.

    public boolean validate()
    {
        boolean ret;
        
        ret = super();
        
        ret = ledgerDimensionAccountController.validate() && ret;
        
        return ret;
    }


  9. Save the form and close the code editor.

    Cheers.. :)

Tuesday, March 27, 2012

Microsoft Dynamics AX - The future Client Win8 / HTML5

Microsoft Dynamics AX - The future Client Win8 / HTML5


Recently I wrote about Microsoft Dynamics AX, and Microsoft in general, specifically focusing around Windows 8 Tablets and the Metro UI. In this focus, I posed the fact, that most likely the future of the AX client will focus around HTML5, as well as XAML. Taking advantage of the Windows 8 Metro UI focus.


Well based on the recently release Microsoft Dynamics AX statement of direction (SOD), it seems that Microsoft has confirmed this educated guess, for the target client of "AX 7".


Taking this further, and my point to a focus around Any Device ERP, Microsoft talks directly to these points with it's focus on the next generation UX:
"Beyond being able to run on any device and anywhere, we are taking a completely new and modern approach to UX through the “Metro” UX experience that customers know from Windows Phone, Windows 8, Xbox, etc.. and we will be investing to support Natural User Interfaces like Speech, Touch and Gestures."

As I've stated in the past, a focus towards such technologies by Partners and Customers is key to building towards the Dynamics of the future. Further, even the design nature of the SOD, being that of Metro style tiles, as well as PartnerSource being redesigned in such a fashion, shows that Microsoft truly is embracing Steve Ballmer's point that the "Metro UI is the Heart & Soul of the Microsoft UX."

This helps further point to my guess, that tools like Visual Studio LightSwitch will enable fast LOB application creation, that can help target the any device concept with UI specific features in the future for Microsoft Metro UI.


As we draw near to Convergence 2012, its important to have this understanding, and to keep a look out from further such announcements from Microsoft. This move builds upon what Microsoft has already done, with it's release of Microsoft Dynamics AX 2012.

For me, this helps sets focus on technology, methodology, design concepts and what to focus on from an educational point of view. I believe Microsoft is taking a right step with this focus, and will help usher in a wave of adoption through such moves, for the Windows 8 Platform. The vision that was put forth some time ago, with 'three screens and a cloud' is finally taking shape, and that includes Microsoft's flagship ERP product: Microsoft Dynamics AX.


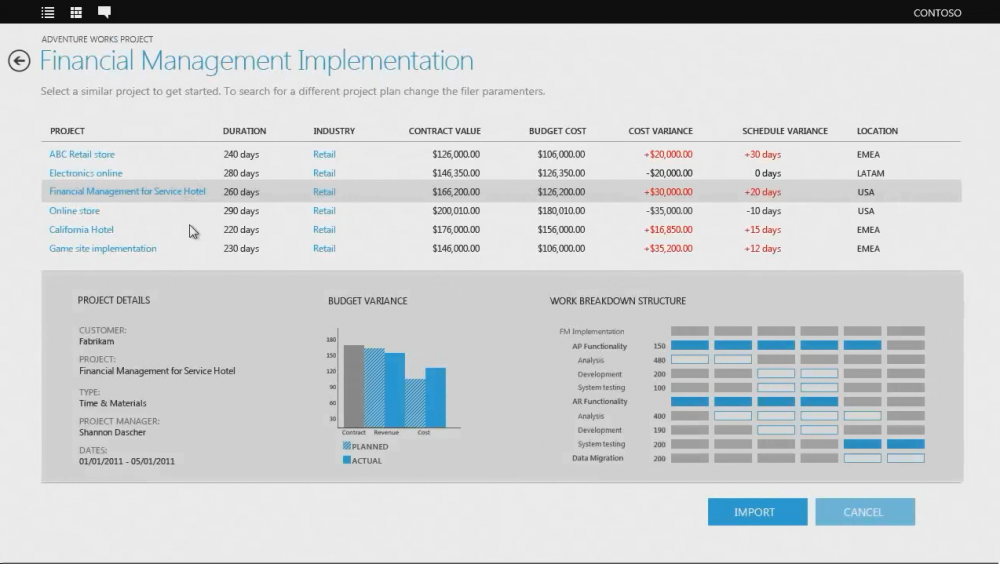
Few more screen shots..


Enjy.. :)


Tuesday, February 28, 2012

List Pages in AX 2012


Hy Folks,

In Ax 2012 List pages like SalesTableListPage, you cannot enable or disable buttons directly on form. Or we can say that the behavior of Form Controls can be only controlled by using classes like for SalesTableListPage, class is SalesTableListPageInteraction.

Very nice scenario based info about same @ 
http://vishal-dax.blogspot.in/2012/02/list-pages-in-ax-2012.html

Enjoy.. :)

Tuesday, February 21, 2012

Dynamics Ax 2012 – AIF Import CSV File

Hi,

Lot of talks going on with regard to Data Import in Ax 2012, as there are many challenges in performing the same. Recently, I have came across a very good article which describes how to Import data into Ax using CSV File.. Have a look, Hope it helps..

1. Dynamics Ax 2012 – AIF Import CSV File – Part 1: Consume Web service
2. 
Dynamics Ax 2012 – AIF Import CSV File – Part 2: Create Item from File adapter

Thursday, February 16, 2012

Data Driven Subscriptions

Data Driven Subscriptions


Creating a data driven subscription is easy with Boomerang. The example below illustrates how to create a subscription, store the output on a file share and notify report users with an email message.

Create an Event 

The unit of work implemented by Boomerang is called Event. The Event is represented by a single record in theEVENT_MASTER table. Before creating the event key (uniqueidentifier), that defines and hold the data driven subscription together, it is need to be declared and set.

Declare @gKey uniqueidentifierset @gKey = newid(); -- Key for my entire event

Declare @jKey_file uniqueidentifierset @jKey_file = newid()-- Key for my file out job
Declare @aKey_file uniqueidentifierset @aKey_file = newid()-- Key for my file out report parameters

Declare @jKey_email uniqueidentifierset @jKey_email = newid()-- Key for my email notification job
The only required columns that do not have a default value are EVENT_MASTER.gKey and EVENT_MASTER.Created_By. We recommend you use these columns to give the event a description and/or classification to make it easier to determine what the event includes and/or is used for. In this example EVENT_MASTER.Source is set to 1 which is a designated integer to group all events bloinging to this particular data subscription application. EVENT_MASTER.Str1 is used to describe the event. See the EVENT_MASTER page for all available options.  
Example:

Insert EVENT_MASTER (gKey, Source, Created_By, Str1)

Values (@gKey, 1, 'domain\username', 'My data driven subscription');
Result:
gKey                          Source  Created_By      Str1
---------/ /----------------- ------- --------------- ----------------------------
3C2A358C-/ /AD95-80D00F40CB6E 3       domain\username My data driven subscription

Define Jobs to be included in the Event

Each event consists of one or more jobs. A job represents an actual unit of delivery, such as email, fax, or print. Each job declares its own content as well as how and where the job’s output will be delivered. For example, a print job must define the path to a printer. Several jobs can make up a single event. The jobs can be entered in any order but there is no means to control which job will execute first or last. 
In this example we will include two jobs in the event: email out and file out represented by the Boomerang tables OUT_EMAIL and OUT_FILE., respectively.

Create OUT_FILE job

We start by creating our file out job.
Example:

Insert OUT_FILE (gKey, jKey, Path, Mode)

Values (@gKey, @jKey_file, '\\unc_path_where_the_report_will_be_saved\', 1); 
Result:
gKey                     jKey                                 Path               Mode
---------/ /------------ ------------------------------------ ------------------ ---------
3C2A358C-/ /80D00F40CB6E 828EE7A8-6CFA-4769-AFBC-A5BE4A0EC442 \\websrv\FS01\tmp\ 1
In this example all files created by this job will be saved in the same directory. If your files should be saved in different directories you will need to create an OUT_FILE record for each unique output path. OUT_FILE.Mode equal to 1 (one) specifies that the output file(s) should be created and existing files should be replaced with the new file. See the OUT_FILE page for all available values of Mode and saving files to an FTP server. 

Add Content to the OUT_FILE Job

Next step is to specify what content of the OUT_FILE job. This is done in EVENT_CONTENT and can look like this:
Example:

Insert EVENT_CONTENT (gKey, jKey, aKey, Src_Type, Path, [Format], Name)

Values (@gKey, @jKey_file, @aKey_file,  2, 'Misc/Sales_by_Region', 'XLS', 'File_Name'); 
Result:
gKey               jKey                              aKey                          Etc.
--------/ /------- ------------/ /------------------ ------------------------------------ 
3C2A358C/ /F40CB6E 828EE7A8-6CF/ /-AFBC-A5BE4A0EC442 1FFED18B-E57A-4019-8110-0278633301D2            
OUT_FILE.jKey and EVENT_CONTENT.jKey link the job (OUT_FILE in this case) to its content. jKey must be unique for each OUT_FILE record and aKey is unique for each EVENT_CONTENT record. Consequently you must create multiple EVENT_CONTENT records if each OUT_FILE job consists of multiple reports, for example.
EVENT_CONTENT is the common content storage for all types of jobs i.e. OUT_FILE, OUT_PRINT, OUT_EMAIL and OUT_FAX. Therefore there are many columns available in EVENT_CONTENT to define the content for each type of job. In the example above we identified a SQL Server Reporting Server report formatted in Excel with the name "File_Name" as the content of the OUT_FILE job define in the previous step. Below is a list of the columns we used as well as the values you can use for each column.
EVENT_CONTENT.Src_Type = 2 (0 = Streaming, 1 = File, 2 = SQL Reporting Services Report)
EVENT_CONTENT.Format = 'XLS' (PDF, HTML, XML etc.) 
EVENT_CONTENT.Name ='File_Name' 
For a complete description of available options see the EVENT_CONTENT page.
SSRS report parameters are stored in CONTENT_PARAMETER. The exmaple below shows how to define report parameters and set their values. and can look like this
Example:

Insert CONTENT_PARAMETER (aKey, [Name], [Value]) 

Values (@aKey_file, 'Sales_Period'convert(varchar(2), datepart(month, getdate() )));
Result:
aKey                                 Name             Value
------------------------------------ ---------------- -------------------
1FFED18B-E57A-4019-8110-0278633301D2 Sales_Period     3
To specify multiple parameters for a single report, use the same value for the akey, the column that links CONTENT_PARAMETER to EVENT_CONTENT. For more details see the CONTENT_PARAMETER page.

Create OUT_EMAIL job

This e-mail will notify a user that the OUT_FILE job stored a report ('Misc/Sales_by_Region') on a file server ('\\unc_path_where_the_report_will_be_saved\')
Example:

Insert OUT_EMAIL (gKey, jKey, IncludeKey, [ReplyTo], [From], Subject, Body)

Values(@gKey, @jKey_email, 0, 'Datasubsriptions@my_domain', '"e-mail display name" <Datasubsriptions@my_domain>', 'Sales by Region', 'A copy of the monthly budget report have now been generated and can be found on the file server in this location: \\ssss\ss');
Result:
gKey                                 jKey                                 IncludeKey  Etc
------------------------------------ ------------------------------------ ----------- 
3C2A358C-C172-479D-AD95-80D00F40CB6E 0621D4FF-91B1-420C-AF82-89B69137BAE5 0           
Setting OUT_EMAIL.IncludeKey to 0 (zero) specifies that advanced tracking of the outgoing email message should be turned off. For all available options see the OUT_EMAIL page. To learn more about different ways of formatting e-mails see the Email Formatting page.
Last step before releasing the event in EVENT_MASTER for processing by the Boomerang services is to add one or more recipient to the notification created in the previous step. 

Example:

Insert OUT_EMAIL_RECEPIENT (jKey, Type, Email)

Values (@jKey_email, 2, 'recepient@domain.com'); 
Result:
jKey                                 Type        Email
------------------------------------ ----------- -------------------------------
0621D4FF-91B1-420C-AF82-89B69137BAE5 2           michael@fuel9.com
OUT_EMAIL_RECEPIENT.Type set to 2 (two) specifies that the recipient should be in the Cc section of the email. If recipients of the email share the OUT_EMAIL_RECEPIENT.jKey they will all get the same email and all email addresses will be visible to all recipients. To hide email addresses set Type to 3 (Bcc). To create individual emails insert unique keys for each OUT_EMAIL.jKey and OUT_EMAIL_RECEPIENT.jKey to identify which email to send to which recipients. Of course you can also specify a different message for each recipient in this cae. For all available options see the OUT_EMAIL_RECEPIENT page.

Release the Event

Last step is to release the event to be processed. In this case Boomerang will send an email and store a SQL reporting server report to a directory i.e. the two jobs OUT_EMAIL and OUT_FILE specified above. To release the event simply set the status to 0 as shown below:
Example:
Update EVENT_MASTER set Status=0 where gKey=@gKey;
Result:
gKey                                 Status
------------------------------------ -----------
3C2A358C-C172-479D-AD95-80D00F40CB6E 0

Delay and Sequencing Jobs 

Although several jobs make up a single event, no specific order is guaranteed in which the jobs will fire. Because of the multi-threaded nature of Boomerang services, chances are they will fire all at once as soon as the corresponding event record is marked "ready" (EVENT_MASTER.Status = 0). To address this two methods are available; EVENT_STATUS.Run_When and Boomerang.dbo.sp_After_XXXX_Out.
The EVENT_STATUS is inserted and updated by the Boomerang services and shows the current status of all events. The EVENT_STATUS record is created when a job is inserted into OUT_EMAIL, OUT_FAX, OUT_PRINT or OUT_FILE. However it may be manipulated to delay (defer) any of the jobs within an event. To delay an email notification and give the OUT_FILE job time to process you can set the value of Run_When in EVENT_STATUS. The example below delays the email notification by 1 hour.
Example:
Update EVENT_STATUS
set Run_When dateadd(hour, 1, getdate()
where jKey=@jKey_email
The second option is to use the event handlers. The event handlers are invoked by the Boomerang services when a job finishes, regardless of success or failure. There is a different event handler for each job type. To ensure that the OUT_FILE job in the above example completed successfully before sending a notification Boomerang.dbo.sp_After_File_Out may be used. 
Example:
Note: The event handler procedures should not be called directly by the developer. Any changes to handler parameter list cannot be made. New parameters may be added with future Boomerang releases upon which a notice will be sent separately.
Alter procedure [dbo].[sp_After_File_Job] 
(
@jKey uniqueidentifier ,
@lKey uniqueidentifier ,
@error_level int 
)
as 
begin
  set nocount on
/*
This section will handle all notifications for any file out job that failed. We're passing the lKey to 
the store proc so that error messages can easily be retrieved from EVENT_LOG
*/
if @error_level != 0 
begin
exec Custom_sp_Send_Admin_Email_Notification @lKey = @lKey
end
/*
If the job is successful we look up what kind of file out job so that we can send different notifications for 
different types of jobs
*/
if @error_level = 0
begin
declare @Type_Of_Notification int
-- Here we're using Source in EVENT_MASTER do distinguishing between different file out jobs
select @Type_Of_Notification = Source from dbo.EVENT_MASTER where gKey=(select gKey from dbo.OUT_FILE where jKey=@jKey) 
-- Send notification for successful file out job
exec Custom_sp_Send_File_Out_Notification  @Type_Of_Notification = @Type_Of_Notification, @Processed_jKey=@jKey 
end
end
 Download Sample1, Sample2

 Enjoy.. :)